Chocolate Pistachio Cupcakes

I'm what they call a cupcake triple threat. I love to bake them, decorate them, and eat them. My absolute favorite is chocolate cake with vanilla buttercream frosting. Zach usually has trouble remembering my favorite, so on my birthday he always orders every possibly combination from the bakery. Even if he forgets my favorite, I can't get mad at his solution. He has it covered. It works, there is always at least one chocolate flavored cupcake with buttercream frosting in the bunch.

I decided to try a new recipe that has some additional ingredients aside from cocoa powder. The original recipe I referred to calls for walnuts. I swapped the walnuts with pistachios; a nut I like much more. I paired the chocolate pistachio with a buttercream frosting and finished the cupcakes off with Nutcracker decorations and all the winter white fairyesque toppings you can imagine. Delightful! xo RCN

Cupcake Recipe (makes one dozen cupcakes):

1 cup of pistachios (original recipe calls for 1 heaping cup of walnuts)

1 cup all purpose flour

1/2 cup cocoa powder

1 teaspoon baking powder

1/4 teaspoon salt

3/4 cups sugar

2 eggs

2 teaspoons vanilla extract

3/4 cups water

Preheat oven to 350F and prep cupcake tin with cupcake liners. Grind pistachios in blender or food processor. I mixed them in a blender until they were very fine and added 1 teaspoon of water into the nuts while I mixed them.

Mix flour, cocoa, baking powder and salt in small bowl, set aside. Then in a larger bowl, whisk finely ground pistachios with sugar until blended. Add one egg at a time, followed by the vanilla extract. Sift a third of the cocoa/flour mixture into the pistachio mixture. Add 1/2 the water, continue alternating dry ingredients and water until all combined, ending with dry ingredients. Scoop the mixture into the cupcake liners and bake for about 20-25 minutes. I always use the toothpick method to help determine when my cupcakes are done. If you insert a toothpick into center of cake and it comes out clean, then finito!

Buttercream Recipe:

1 stick of salted butter

1 teaspoon vanilla extract

1 small box of confectioners sugar

1 1/2 Tablespoons of Milk

Soften butter to room temp and then mix until fluffy with wooden spoon or hand mixer. Add vanilla and continue to mix. Sift in the confectioners sugar and continue to mix all ingredients. Lastly, add the milk. You can always add more milk at the end if you need to make the buttercream softer. I usually like buttercream relatively thick. 

Decorations:

A pinch of unsweetened coconut per cupcake

A few handfuls of vanilla chips and marshmallows divided between all cupcakes

A sprinkle of pearlized Wilton decorative candy balls per cupcake

Meri Meri cupcake kit - I used the Nutcracker kit which is sold out of a few stores, but available on ebay. I also recently saw this set at Homegoods. If you are still looking for something holiday, Meri Meri still has an adorable santa/reindeer kit available online HERE.

Meri Meri has some of the most adorable cupcake kits, you can find them all HERE.


Source: http://yinandyolk.com/2016/04/14/chocolate...

Chocolate Pretzel Wreaths

I love chocolate pretzel nests for Easter, so I thought why not turn the nests into wreaths and make it a Christmas themed dessert. Putting the wreaths together is a little messy with handling a lot of melted chocolate, but well worth it in the end. 

For about 18 wreaths, you will need:

1 reg size bag pretzel sticks (you will use about 1/2-3/4 bag)

3 tablespoons coconut oil

12 ounce bag of chocolate chips

1/2 cup green colored chocolate chips

Parchment paper and zip lock bag

Red and white/pearl decorating balls (various sizes)

First, prep the holly decoration. Melt green chips in microwave on defrost setting for about two minutes. Stir and mix until smooth and melted. It will not become as liquid like as the chocolate chips you will later melt for the wreaths, but that is okay. Put green melted chocolate in a zip bag and cut corner off. Squirt out small groupings of the green chocolate in leaf forms onto parchment paper. Let sit for a half hour. 

First, melt the chocolate and coconut oil in a bowl in the microwave. Zap for two minutes, remove and stir. If the chocolate does not melt to liquid form, zap for another 30 seconds or so. Once chocolate is stirred and melted, break up the pretzel sticks and add them into the chocolate. Cover in chocolate and use hands to form into wreath shapes on parchment paper. Sit out for about ten minutes after shaping wreaths and then sit in refrigerator for ten minutes before adding decorations. You do not want the chocolate to be completely hardened before you decorate. Eat up! xo RCN


Matcha Green Trees, Oh Fudge!

I am a huge matcha green tea fan. I have been wanting to create a dessert with matcha powder for some time, now. I mean, matcha is green. It's a perfect natural food coloring and flavor to include in some sweet treats for Christmas. This fudge recipe is super simple. If you are not a matcha fan, you can easily omit the powder and replace with a splash of green food coloring and you will get the same look, yet different flavor. Without matcha, the fudge will be vanilla, not bad. You may want to add a splash of vanilla extract, as well, if removing the matcha from the recipe. Eat up and be merry! xo RCN

Recipe yields about 24-26 fudge pops. You will need the following: 

13 Wooden popsicle sticks, cut in half

4 Mini candy canes, crushed/smashed with a large knife

1/4 cup (or less) shredded coconut, can be sweetened or unsweetened

2 Tbsp of green matcha powder, I used U Matcha Natural green tea powder from Whole Foods

2 Tbsp unsalted butter

1/2 Cup heavy whipping cream

14oz White chocolate morsels, I used Ghirardelli chips, (just over 1 1/2 cups)

8" or similar size small square baking pan, line with wax paper

Small saucepan 

Sifter (for matcha powder)

Rubber spatula

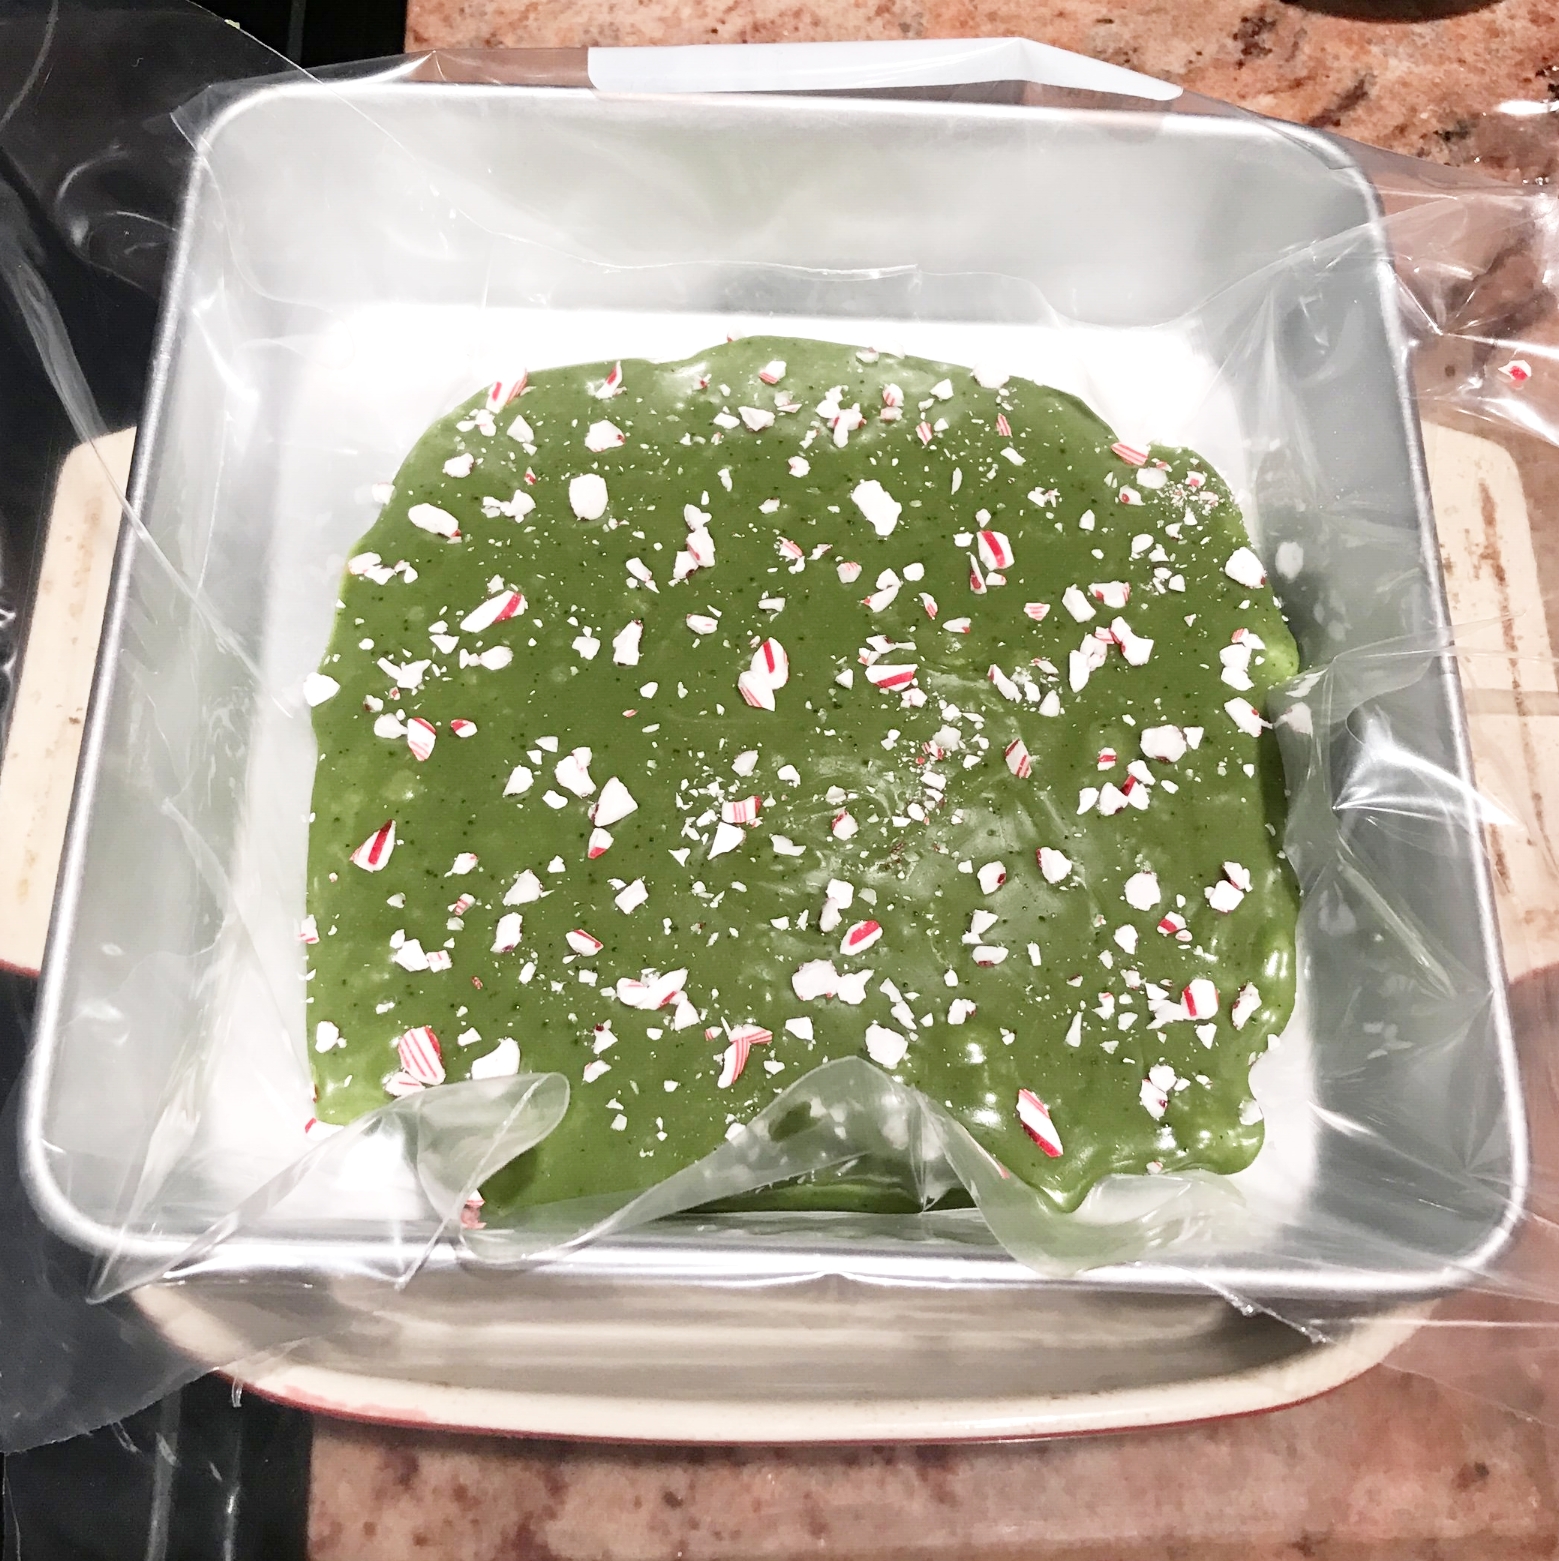
Prep by cutting popsicle sticks in half. Crush and smash candy canes into small pieces for topping. Chop butter into small pieces, similar in size to white chocolate chips. Line square pan with wax paper OR use a freezer ziplock bag to line pan, like me, if you are out of wax paper.

In small saucepan on stove, begin heating whipping cream on medium heat. The cream will heat quickly, you will want to stir with rubber spatula as it heats up. As soon as it begins to bubble, remove from heat and add chocolate and butter. Mix the butter and chips into the cream quickly with the spatula. As it begins to combine and harden, sift the matcha powder into the pan. Continue to mix all ingredients together until thick and smooth and green tea powder is evenly combined. Pour fudge mixture into 8" pan lined with wax paper. Pour and spread fudge to be about 1" thick all around. The fudge does not have to be touching all sides of pan, as long as it has an edge butted up against the wax paper. Refer to my pic above for example. Sprinkle candy cane pieces evenly across top of fudge. Refrigerate for a few hours until fudge is firm and set. Remove fudge from pan and cut into four quadrants. Pull fudge pieces from paper and begin cutting triangle shapes.  Use cutting guideline below to help cut trees. Refer to guide: Begin with thicker dotted lines and continue to cut all dotted lines shown in guide.

Note: Guideline below cuts about 24 trees, but you may have extra scraps that can be formed into additional trees. I had extra scraps from the beginning, when I cut my solid piece of fudge into an even square before I cut triangles out.

Last step is to push cut popsicle sticks into center bottom of each tree and add coconut to tops of trees. The shortest side of triangle will be your bottom of tree. Push coconut into all sides of top of trees. The fudge will be firm so you will need to push the coconut inward firmly in order to make the coconut stick onto fudge. If trees look sparse with candy cane coating, add some additional at end to make the trees look more cheery. If not all triangles are perfect, even better, they will all be unique. Big, crooked, or small, they will all taste great.                   


Source: http://www.justonecookbook.com/green-tea-c...